Wednesday 21 August 2013
Monday 10 June 2013
Node.js and real-time applications
Hey there guys , posting after a long long time . Was a bit busy and stuff .
So let's talk about node.js . What is node.js ? It is a server-side software system that can be used to write scalable web applications . As the name suggests , all the code is basically written in javascript .
So what makes node stand out from conventional server side solutions such as php/jsp or other such stuff ? The main advantage of using node.js is it's advanced push capability . That is server can push information to the client in real time , whenever there is a change in the web page or new content is added which means it enables persistent connection between your page and the web server . Node.js uses a non-blocking event driven I/O . In node each persistent connection won't block other requests .Other languages like php sets up a new server process for each connection and we might end up with using a lot of cpu resources . Thus nodejs is suitable for handling many persistent connections at once without using up a huge amount of resources .
To get the best out of node , use Socket.IO and redis . So what is socket.io ? Socket.IO enables you to broadcast data to clients based on a certain event . It uses websockets protocol primarily if present , but it can use other methods too like Adobe flash sockets , JSONP polling , ajax , long polling . It allows us to have almost "instant" feedback from the server . Redis is a in-memory , key:value store . Redis supports abstract data types like hashes , sets and lists . Also the pub-sub system allows you to subscribe to messages from a certain channel and so on which can be used for notification systems , chat rooms and so on.
Saturday 30 March 2013
Denying access to a particular folder on your web server
Suppose you have a directory in your web server which contains sensitive files like files containing database connection passwords , app-secret id's for using 3rd party services etc . You want to block access to that particular folder . So how are you going to do it ? Well it's pretty simple . Just add a .htaccess file to that folder . Open it up , and add the following lines :-
Order deny,allow
deny from all
This will deny access to any files in that folder . Remember that all those files in the folder can be accessed only if you add a require , include directive in a file on the server-side . However ajax calls or any sort of client request won't work on the files of that directory .
Friday 29 March 2013
PHP Tutorial . Chapter 5 . PHP Control Statements ( Part 2 - Loops 1 (For Loop) )
While writing your code , you might encounter situations when you might want to execute the same set of statements over and over again . PHP like other programming languages implements this in the form of loops . There are three types of looping constructs commonly used in php - for , while , foreach . The last one is usually used for resources , associative arrays .
1) For Loop
The following piece of code illustrates the use of a for loop .
for($i=1 ; $i<=10 ; $i++)
{
echo $i."<b/>";
}
The above code will print 1 to 10 on different lines . So how does this work ? First we assign $i = 1 . Then when the loop executes each time , the condition $i<=10 . The statements inside the looping construct are executed only if this condition is true . Then the value of the variable i is incremented .
The given code can also be written as the following . It is an example of a loop where no statements are within the control statement itself . We assign the variable out of the loop and also the conditions are checked for and the variable is incremented inside the loop .
$i=1;
for(;;)
{
echo $i++."<br/>";
if($i>10)
break;
}
The only thing that may sound unfamiliar to guys who are new to programming is the break statement . Whenever a break statement is encountered , the loop is terminated then and there . There is also something called continue , which is the opposite of break , continue ends the loop over there and starts a new loop .
Saturday 23 March 2013
Off the grid ...
Hello guys :) I am posting after a long time , it may be yet another couple of weeks until i can get back to blogging regularly , owing to exams/competitions etc etc . Please bear with me :) I Promise to be back with nice tutes and awesome hacks !! Till then cya :) Bye !!
Wednesday 27 February 2013
Working with XML in PHP
Hey guys !! Writing an article after a long long time !! Been a month since i last wrote an article (courtesy mid semester exams) . So today i will give you a basic intro as to how you will load an xml file in php and add stuff to it . It's applications ? Well you may have a sitemap which is to be uploaded in real time as more links are added to your website . Or say you want to store data in xml format and would make an ajax call to the file etc .

Example of a sitemap.xml file :-
<?xml version="1.0" encoding="UTF-8"?>
<urlset xmlns="http://www.sitemaps.org/schemas/sitemap/0.9">
<url>localhost/account/id/nraider0207</url>
<url>localhost/account/id/anuragdas</url>
</urlset>
So how can you open up and edit an XML File ?Example of a sitemap.xml file :-
<?xml version="1.0" encoding="UTF-8"?>
<urlset xmlns="http://www.sitemaps.org/schemas/sitemap/0.9">
<url>localhost/account/id/nraider0207</url>
<url>localhost/account/id/anuragdas</url>
</urlset>
Consider the following fragment of code :
$xml = new DOMDocument();
$xml->load("C:\wamp\www\phpweb20\public\sitemap\sitemap.xml");
$root = $xml->firstChild;
$newElem = $xml->createElement('url');
$root->appendChild($newElem);
$txt = $xml->createTextNode("http://localhost/account/id/example");
$newElem->appendChild($txt);
$xml->save("C:\wamp\www\phpweb20\public\sitemap\sitemap.xml");
Let us consider the fragment of code line by line :
The first line creates a new object , which might be used to represent an entire HTML/XML document . Since both xml and html semantics are identical , so this can be used for creating/editing html too . The next line will load the file as given by the location . The next line selects the first child of the document root (since we specified $xml as document root in the first line , if you pass along any other element , the first child of that element will be selected) . In the example i cited above the element
Sunday 3 February 2013
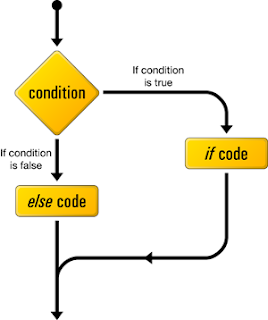
PHP Tutorial . Chapter 5 . PHP Control Statements (Part 1 if-else statement)
What fun is programming if you don't have control over the code ? Best coding practices include writing code that responds differently to different situations . Suppose you have a code let's say , which takes in the type of an employee in an office and accordingly outputs the salary for that position , lets say , what would you do ?
( Cookies again for C Programmers , this section is actually same as the if-else you were accustomed to before !! )
The most popular control statement in any programming language is the if-else construct . So how to use the if else construct ? Let's follow the following example and things will seem pretty easy then .
Algorithm :
Example
Lets say that we have a variable that stores the type of an employee at an office . We will check that variable and print out the corresponding salary .
$a = "General Manager";
if($a=="General Manager")
echo "1000000";
else if($a=="CEO")
echo "2000000";
else if($a=="Chairman")
echo "3000000";
?>
The above code outputs 1000000 .
Also an important aspect of php code is that it continues from the last block . Suppose you have a file containing both php and html . You have a block of php code , then you have some html and then again a block of php code , php will continue from the last line of the previous block . This will be clear from the following example .
Example
$a = 5 ;
if($a==5)
{
echo "The number is equal to 5
";
$a++;
echo "Now it's value is :- ".$a."
";
}
else if($a>5)
{
?>
( Cookies again for C Programmers , this section is actually same as the if-else you were accustomed to before !! )
The most popular control statement in any programming language is the if-else construct . So how to use the if else construct ? Let's follow the following example and things will seem pretty easy then .
Algorithm :

Example
Lets say that we have a variable that stores the type of an employee at an office . We will check that variable and print out the corresponding salary .
$a = "General Manager";
if($a=="General Manager")
echo "1000000";
else if($a=="CEO")
echo "2000000";
else if($a=="Chairman")
echo "3000000";
?>
The above code outputs 1000000 .
Also an important aspect of php code is that it continues from the last block . Suppose you have a file containing both php and html . You have a block of php code , then you have some html and then again a block of php code , php will continue from the last line of the previous block . This will be clear from the following example .
Example
$a = 5 ;
if($a==5)
{
echo "The number is equal to 5
";
$a++;
echo "Now it's value is :- ".$a."
";
}
else if($a>5)
{
?>
echo "The number is greater than 5
";
echo "Also this statement is in the second php block
";
}
else
{
echo "The number is lesser than 5
";
echo "Also this statement is in the second php block
";
}
?>
This code won't show any error even though the else-if block is spread across the two blocks . This is quite a flexible feature !! It comes in handy if you want to place some html code within the conditions or within an incomplete block .
Subscribe to:
Posts (Atom)